
It’s now been almost a year and a half since I started learning about networking and making multiplayer games. I do want to make it clear from the beginning that I am still not an expert on this topic. There are many remaining gaps in my knowledge of networking, and I’m always learning more.
However, over the last seventeen months of helping others and working with this stuff, I’ve developed a solid understanding of the logic and concepts behind the code.
UPDATE: the networking solution we build in this post is outdated. Check out my new networking tutorial series—it’s cleaner, includes UDP support, and it’s in video form!
I remember struggling to find helpful, actionable resources—so when I found Kevin Kaymak’s C# networking tutorials, I was absolutely stoked. A massive shoutout goes to him for sharing his knowledge. Most of what I learned originally came from his videos, and his networking solution works beautifully.
Those tutorials are unfortunately no longer available, but Kevin was nice enough to give me permission to share what I learned from him.
UPDATE: Kevin’s tutorials are back on YouTube, make sure to check them out!
In this C# Networking tutorial, we will:
- set up a dedicated server in a C# console application
- set up a client in Unity
- connect the client to the server and send data back and forth
This is not a beginner tutorial! If you’ve just started learning to code, I strongly recommend against building multiplayer games. It adds a whole other level of complexity, especially when trying to find and fix bugs. Before continuing with this tutorial, make sure you:
- are comfortable using Visual Studio (managing projects, adding classes, etc.)
- are familiar with Unity’s editor and workflow
- have a solid understanding of programming in general
To keep this post as short as possible, I will be assuming familiarity on your part with Unity, Visual Studio, and C#. If you run into problems at any point, feel free to ask for help on my Discord server! Also, if you have any feedback for me (this is my first tutorial), please share it either in the comments or on Discord.
There’s a lot to cover, so this will be quite a lengthy tutorial. I would have liked to split it into multiple posts, but this first part is very interconnected, so I decided to keep it all in one. This does not mean you have to complete this whole tutorial in one sitting—in fact I would recommend against it. The post is split into a few subsections, so it’s relatively easy to take breaks in between.
Some quick terminology
A packet is a chunk of data that is sent over one of the internet’s protocols.
TCP stands for Transmission Control Protocol and enables two hosts to establish a connection and exchange streams of data. It guarantees that packets will be delivered in the same order they were sent.
UDP stands for User Datagram Protocol. Similarly to TCP, it allows two hosts to exchange data. While UDP has a speed advantage over TCP, there’s no guarantee that the packets will arrive in the same order, or that they’ll arrive at all.
Although TCP is the dominant protocol on the internet, UDP is often used in fast-paced multiplayer games due to the extra speed. In this tutorial series we will be using TCP. This is meant to be an introduction to networking, and dealing with lost packets would just make things more complex. Even though TCP is slightly slower, it’ll be absolutely fine for most games you’re working on.
1 – Setting up the server
We’ll start by getting the server up and running. In Visual Studio, create a new Console App (.NET Framework) and call it something like “Game Server”. Create a new class called ServerTCP and make sure the System, System.Net, and System.Net.Sockets namespaces are included. Then add static fields for the port number and the server’s TcpListener. I went with a static implementation for the server because it’s easy to work with, so most fields and methods in this section will be static.
using System;
using System.Net;
using System.Net.Sockets;

namespace Game_Server
{
    class ServerTCP
    {
        private static TcpListener socket;
        private static int port = 16320;
    }
}
The TcpListener is what will handle most of the connection stuff for us, we just need to implement it properly. When it comes to choosing the port number your server will be running on, you can pretty much pick anything you like. Keep in mind that only one program can be using a computer’s port at any given time, so try to pick a number that isn’t on this list. I went with 16320.
Next, add a public InitNetwork method. This will handle all the network setup when starting our server. Inside, we’ll initialize our TcpListener and call its Start() method before beginning to accept client connections.
        private static int port = 16320;

        public static void InitNetwork()
        {
            socket = new TcpListener(IPAddress.Any, port);
            socket.Start();
            socket.BeginAcceptTcpClient(new AsyncCallback(ClientConnected), null);
        }
Don’t worry about the error this produces, we’ll fix that in a moment. BeginAcceptTcpClient has two parameters. The first is an async callback reference, which simply calls the referenced method (ClientConnected) when the asynchronous operation completes. The second is a state, but we’ll pass in null.
To fix the error, we need to create a new method called ClientConnected that will be called whenever a client connects. In it we’ll create a new TcpClient to hold the newly connected client’s info. Set its NoDelay property to false to disable the delay when its send and receive buffers aren’t full (more info about that here). Then we’ll continue accepting client connections.
        ...

        private static void ClientConnected(IAsyncResult _result)
        {
            TcpClient _client = socket.EndAcceptTcpClient(_result);
            _client.NoDelay = false;
            socket.BeginAcceptTcpClient(new AsyncCallback(ClientConnected), null);
        }
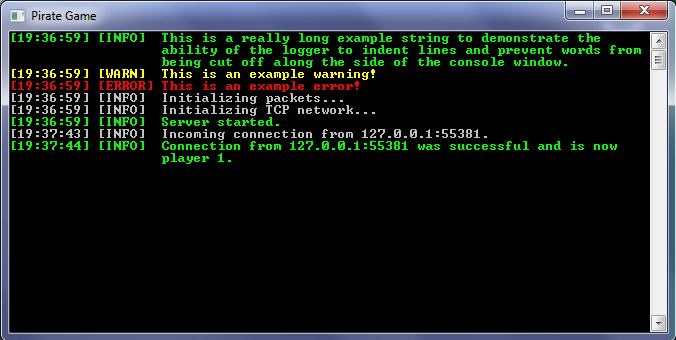
At this point, we probably want to know when a client connects, so let’s add some console output. You can use Console.WriteLine() to do this, or if you’d prefer your console to look like the one in the image below, you can grab my Logger class from the networking resources channel on Discord. I tried uploading it as a .cs and as a .txt file, but WordPress wouldn’t allow it for “security reasons”. Even if you don’t use my Logger class, you’ll have to join my server to grab the ByteBuffer class, which we’ll be using later on when we get to the sending and receiving of data. I would have preferred to have the file available right here, but like I said, WordPress didn’t allow it—I’m sorry for any inconvenience this causes.
After adding the Logger class to your project, there’s a bit of setup to do. In your Program class’s Main method, add Logger.Initialize() and pass in your preferred default console text color. I chose cyan.
        static void Main(string[] args)
        {
            Logger.Initialize(ConsoleColor.Cyan);
        }
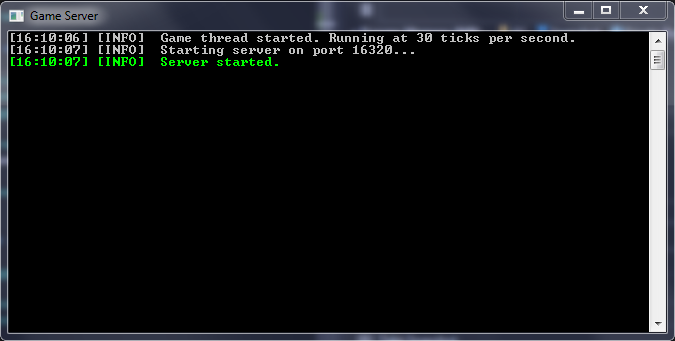
In order for the Logger to be thread safe, it relies on its WriteLogs() method to be called every frame. To do this, we’ll create an update loop, running on a tick system. We won’t be using this loop to do anything else in this tutorial, but you’ll need it further down the line, so don’t skip this part.
Create a new class called Constants. Inside, create a constant for the ticks per second (one tick will be like one frame) and the milliseconds per tick. While we’re here, we can also add a constant for the max players that can be connected at any time.
    class Constants
    {
        public const int MAX_PLAYERS = 100;
        public const int TICKS_PER_SEC = 30;
        public const float MS_PER_TICK = 1000 / TICKS_PER_SEC;
    }
Next, create a “Globals” class and add a bool called serverIsRunning.
    class Globals
    {
        public static bool serverIsRunning = false;
    }
Back in the Program class, we’ll set serverIsRunning to true and start a new thread to run our game loop on. Make sure to include the System.Threading namespace.
using System;
using System.Threading;

namespace Game_Server
{
    class Program
    {
        static void Main(string[] args)
        {
            Globals.serverIsRunning = true;
            Logger.Initialize(ConsoleColor.Cyan);

            Thread _gameThread = new Thread(new ThreadStart(GameLogicThread));
            _gameThread.Start();
        }
    }
}
Now create a new method called GameLogicThread and add the following code. Essentially, while the server is running, it will repeatedly check if the next tick should be run. If so, it will write any logs that were logged to the console (that’s also where all you game logic should go).
        static void Main(string[] args)
        {
            ...
        }

        private static void GameLogicThread()
        {
            Logger.Log(LogType.info1, "Game thread started. Running at " + Constants.TICKS_PER_SEC + " ticks per second");
            // Game logic would go here

            DateTime _lastLoop = DateTime.Now;
            DateTime _nextLoop = _lastLoop.AddMilliseconds(Constants.MS_PER_TICK);

            while (Globals.serverIsRunning)
            {
                while (_nextLoop < DateTime.Now)
                {
                    Logger.WriteLogs();

                    _lastLoop = _nextLoop;
                    _nextLoop = _nextLoop.AddMilliseconds(Constants.MS_PER_TICK);
                }
            }
        }
If you run the console app now, you’ll probably notice very high CPU usage (mine is 25%). This isn’t right, and is caused by the thread “idling” between ticks. To fix the problem, sleep the thread until the next tick:
            while (Globals.serverIsRunning)
            {
                while (_nextLoop < DateTime.Now)
                {
                    Logger.WriteLogs();

                    _lastLoop = _nextLoop;
                    _nextLoop = _nextLoop.AddMilliseconds(Constants.MS_PER_TICK);

                    if (_nextLoop > DateTime.Now)
                    {
                        Thread.Sleep(_nextLoop - DateTime.Now);
                    }
                }
            }
Now that everything is in place to allow the Logger to work properly, add these two logs to the methods in your ServerTCP class.
        public static void InitNetwork()
        {
            Logger.Log(LogType.info1, "Starting server on port " + port + "..");
            ...
        }

        private static void ClientConnected(IAsyncResult _result)
        {
            ...
            Logger.Log(LogType.info1, "Incoming connection from " + _client.Client.RemoteEndPoint.ToString());
        }
1.1 – Creating the client class
In order to keep track of connected clients, we’ll need to store their information somehow. Let’s create a class called Client to do this. Add a field to store the player’s ID, and a boolean to store whether or not the client is actually in-game, or simply connected. We’ll also need a TcpClient and a NetworkStream field, which is used to actually transfer data.
using System;
using System.Net.Sockets;

namespace Game_Server
{
    class Client
    {
        public int playerID;
        public bool isPlaying = false;

        public TcpClient socket;
        public NetworkStream stream;
    }
}
Next, grab the ByteBuffer class from the networking resources channel on my Discord server and add it to your project. Again, I would’ve liked to add the download link here, but WordPress wouldn’t allow it. Then, create a Player class, add a field to store the player ID, and create a constructor to set the ID when a new instance is created. Finally, go back to the Client class and add a field for both the ByteBuffer and the Player, as well as a private byte array.
    class Player
    {
        public int ID;

        public Player(int _ID)
        {
            ID = _ID;
        }
    }
    class Client
    {
        ...
        public ByteBuffer buffer;
        public Player player;

        private byte[] receiveBuffer;
    }
Create a new method called StartClient (in the Client class) which will set everything up when a client connects. Inside, we’ll start off by setting the send and receive buffer sizes to 4096.
        public void StartClient()
        {
            socket.ReceiveBufferSize = 4096;
            socket.SendBufferSize = 4096;
        }
Next, initialize our stream, our receiveBuffer, and start reading from the stream. ReceivedData is the name of a method we’ll add shortly. Then, assign a new Player object to the player field.
        public void StartClient()
        {
            socket.ReceiveBufferSize = 4096;
            socket.SendBufferSize = 4096;

            stream = socket.GetStream();
            receiveBuffer = new byte[socket.ReceiveBufferSize];
            stream.BeginRead(receiveBuffer, 0, socket.ReceiveBufferSize, ReceivedData, null);
            player = new Player(playerID);
        }
Now we need a method to handle any data that is read from the network stream. Similarly to the ServerTCP’s ClientConnected method, ReceivedData is called asynchronously—except it’s called when data is received from a client instead of when a client connects. We’ll put a try catch block in this method to let us know if something goes wrong while receiving data.
        private void ReceivedData(IAsyncResult _result)
        {
            try
            {

            }
            catch (Exception _ex)
            {
                Logger.Log(LogType.error, "Error while receiving data: " + _ex);
                return;
            }
        }
As for the method’s functionality, we’ll start by getting the length of the data (the number of bytes). If the byte length is zero or less, we’ll stop executing the rest of the code. If it’s one or more, we’ll copy the data into a temporary array, which frees up the receivedBuffer to collect new data without overwriting the bytes we just received. Then, we’ll call the handle data method (which we haven’t created yet) and continue reading from the stream.
        private void ReceivedData(IAsyncResult _result)
        {
            try
            {
                int _byteLength = stream.EndRead(_result);
                if (_byteLength <= 0)
                {
                    return;
                }

                byte[] _tempBuffer = new byte[_byteLength];
                Array.Copy(receiveBuffer, _tempBuffer, _byteLength);

                ServerHandle.HandleData(playerID, _tempBuffer); // We'll create this later
                stream.BeginRead(receiveBuffer, 0, socket.ReceiveBufferSize, ReceivedData, null);
            }
            catch (Exception _ex)
            {
                Logger.Log(LogType.error, "Error while receiving data: " + _ex);
                return;
            }
        }
Before we move on to the actual handling of the data we receive, let’s finish properly handling incoming connections. The Client class still needs a disconnection method that resets everything correctly.
        private void CloseConnection()
        {
            Logger.Log(LogType.info1, "Connection from " + socket.Client.RemoteEndPoint.ToString() + " has been terminated");

            player = null;
            isPlaying = false;

            socket.Close();
            socket = null;
        }
Now call CloseConnection() right before the two returns in our ReceivedData method.
        private void ReceivedData(IAsyncResult _result)
        {
            try
            {
                int _byteLength = stream.EndRead(_result);
                if (_byteLength <= 0)
                {
                    CloseConnection();
                    return;
                }

                ...
            }
            catch (Exception _ex)
            {
                Logger.Log(LogType.error, "Error while receiving data: " + _ex);
                CloseConnection();
                return;
            }
        }
1.2 – Finishing connection management
Now we need a way of storing all the connected clients. We’ll create a dictionary of player IDs and their corresponding clients in our Globals class (you could use an array or a list as well, but I’ve found dictionaries to be pretty convenient in this case).
    class Globals
    {
        public static Dictionary<int, Client> clients = new Dictionary<int, Client>();
        public static bool serverIsRunning = false;
    }
Back in our ServerTCP’s ClientConnected method, we need to add the client that connects to the clients dictionary. We’ll do this by looping through all the client objects in clients and checking if their socket field has been assigned. If it has, that means that “slot” is full, so we check the next one. If an empty slot is found, we’ll assign the locally stored TcpClient to that client’s socket, we’ll set the player ID, and we’ll call StartClient(). Then we return out of the method to prevent the client from filling up every available spot on the server.
        private static void ClientConnected(IAsyncResult _result)
        {
            ...

            for (int i = 1; i <= Constants.MAX_PLAYERS; i++)
            {
                if (Globals.clients[i].socket == null)
                {
                    Globals.clients[i].socket = _client;
                    Globals.clients[i].playerID = i;
                    Globals.clients[i].StartClient();
                    return;
                }
            }
        }
Code after this for loop won’t ever be run unless the server is full, so that’s where you should put any code to handle that scenario. For now, a simple message to the console will do.
        private static void ClientConnected(IAsyncResult _result)
        {
            ...

            for (int i = 1; i <= Constants.MAX_PLAYERS; i++)
            {
                ...
            }

            Logger.Log(LogType.warning, "Server full");
        }
If a client were to connect to our server at this point, we’d get an error because we’re trying to access key value pairs in the dictionary that don’t exist (we also haven’t called InitNetwork() anywhere). Let’s create a General class, and add an InitServerData method that populates our clients dictionary.
    class General
    {
        private static void InitServerData()
        {
            for (int i = 1; i <= Constants.MAX_PLAYERS; i++)
            {
                Globals.clients.Add(i, new Client());
            }
        }
    }
Now let’s add a StartServer method that ensures everything is set up correctly. Inside, we need to call InitServerData() before calling our ServerTCP’s InitNetwork(). At the end we can put a log to tell us that the server has finished starting.
        public static void StartServer()
        {
            InitServerData();
            ServerTCP.InitNetwork();
            Logger.Log(LogType.info2, "Server started");
        }

        private static void InitServerData()
        {
            ...
        }
Finally we’ll call StartServer() from our Program class.
        static void Main(string[] args)
        {
            ...
            _gameThread.Start();

            General.StartServer();
        }
To make sure this works, comment out ServerHandle.HandleData(playerID, _tempBuffer); in the Client class’s ReceivedData method and run the program. You should see something like this:
Remember to uncomment the handle data method, otherwise later on your server will be incapable of processing the data it receives.
1.3 – Sending data
Create a new class called ServerSend and add a SendDataTo method. The _playerID parameter holds the ID of the player to send the data to, and the _data parameter holds the bytes we are sending. Add a try catch block inside to catch any errors that occur when sending data.
    class ServerSend
    {
        public static void SendDataTo(int _playerID, byte[] _data)
        {
            try
            {

            }
            catch (Exception _ex)
            {
                Logger.Log(LogType.error, "Error sending data to player " + _playerID + ": " + _ex);
            }
        }
    }
In the try block, add an if statement to check whether or not the client we are trying to send data to is still connected. If he is, we create a local ByteBuffer instance and write the packet’s length (number of bytes) to it. Then write the rest of the data to the buffer. By adding the packet length to the beginning of the packet, we’ll be able to check and make sure we got the entire packet on the receiving end.
        public static void SendDataTo(int _playerID, byte[] _data)
        {
            try
            {
                if (Globals.clients[_playerID].socket != null)
                {
                    ByteBuffer _buffer = new ByteBuffer();
                    _buffer.WriteInt(_data.GetUpperBound(0) - _data.GetLowerBound(0) + 1);
                    _buffer.WriteBytes(_data);
                }
            }
            catch (Exception _ex)
            {
                Logger.Log(LogType.error, "Error sending data to player " + _playerID + ": " + _ex);
            }
        }
After setting up the buffer, we need to write its contents to the client’s stream. Finally, dispose the buffer.
        public static void SendDataTo(int _playerID, byte[] _data)
        {
            try
            {
                if (Globals.clients[_playerID].socket != null)
                {
                    ...

                    Globals.clients[_playerID].stream.BeginWrite(_buffer.ToArray(), 0, _buffer.ToArray().Length, null, null);
                    _buffer.Dispose();
                }
            }
            catch (Exception _ex)
            {
                Logger.Log(LogType.error, "Error sending data to player " + _playerID + ": " + _ex);
            }
        }
Now we’re ready to create packets that can be sent from the server. We’ll need a way of distinguishing packets from each other, so create a new class called Packets, delete everything inside, and add two enums. We’ll use the enums and their values as packet IDs.
namespace Game_Server
{
    public enum ServerPackets
    {
        // Sent from server to client
        welcome = 1
    }

    public enum ClientPackets
    {
        // Sent from client to server
        welcomeReceived = 1,
    }
}
Each packet needs its own ID. Today, we’ll just create a “welcome” packet to send to clients when they connect, and a “welcome received” packet to send back to the server.
Back in our ServerSend class, add a new method called Welcome. Inside, create a new ByteBuffer instance and add the packet ID to it.
        public static void SendDataTo(int _playerID, byte[] _data)
        {
            ...
        }

        public static void Welcome(int _sendToPlayer, string _msg)
        {
            ByteBuffer _buffer = new ByteBuffer();
            _buffer.WriteInt((int)ServerPackets.welcome);
        }
Next, we’ll write the data we want to send to the buffer. In this case we’ll send a welcome message in the form of a string, as well as the client’s ID.
        public static void Welcome(int _sendToPlayer, string _msg)
        {
            ByteBuffer _buffer = new ByteBuffer();
            _buffer.WriteInt((int)ServerPackets.welcome);

            _buffer.WriteString(_msg);
            _buffer.WriteInt(_sendToPlayer);
        }
Finally, we’ll call our SendDataTo method, passing it the ByteBuffer instance, before disposing the buffer.
        public static void Welcome(int _sendToPlayer, string _msg)
        {
            ...

            SendDataTo(_sendToPlayer, _buffer.ToArray());
            _buffer.Dispose();
        }
When creating packets, always stick to this format:
- create a ByteBuffer instance
- write the packet ID to the buffer
- write any data you wish to send to the buffer
- send the buffer
- dispose the buffer
In order to finish up the sending process, we need to call our Welcome() method from somewhere. Do this at the end of the Client’s StartClient method.
        public void StartClient()
        {
            ...
            player = new Player(playerID);
            ServerSend.Welcome(playerID, "Welcome to the server!");
        }
1.4 – Receiving data
Create a new class called ServerHandle and add a HandleData method. The _playerID parameter holds the ID of the player that sent the data, and the _data parameter holds the bytes that were received. Next, create a local byte array and clone _data into it, and create a local integer to store the received packet’s length.
    class ServerHandle
    {
        public static void HandleData(int _playerID, byte[] _data)
        {
            byte[] _tempBuffer = (byte[])_data.Clone();
            int _packetLength = 0;
        }
    }
Before we do anything else, we need to check if the client’s buffer field has been assigned. If not, assign it.
        public static void HandleData(int _playerID, byte[] _data)
        {
            byte[] _tempBuffer = (byte[])_data.Clone();
            int _packetLength = 0;

            if (Globals.clients[_playerID].buffer == null)
            {
                Globals.clients[_playerID].buffer = new ByteBuffer();
            }
        }
Now we write the received bytes to the client’s buffer before checking if the buffer’s length is zero. If it is, we clear the player’s buffer and stop handling the data (because nothing was received).
        public static void HandleData(int _playerID, byte[] _data)
        {
            ...

            Globals.clients[_playerID].buffer.WriteBytes(_tempBuffer);

            if (Globals.clients[_playerID].buffer.Count() == 0)
            {
                Globals.clients[_playerID].buffer.Clear();
                return;
            }
        }
Next, we check if the client’s buffer exceeds four bytes in length. If it does, it contains an integer (integers are four bytes long) that holds the rest of the packet’s length, so we assign that value to our _packetLength variable. Then we check if the packet’s length is zero or less, in which case we clear the buffer and stop handling the data (because there’s nothing left to handle).
        public static void HandleData(int _playerID, byte[] _data)
        {
            ...

            if (Globals.clients[_playerID].buffer.Length() >= 4)
            {
                _packetLength = Globals.clients[_playerID].buffer.ReadInt(false);
                if (_packetLength <= 0)
                {
                    Globals.clients[_playerID].buffer.Clear();
                    return;
                }
            }
        }
If the data passes all those checks, we actually handle it. Create a while loop that checks if the packet length still exceeds zero, but is still less than the data’s length (minus four because the packet length takes up those bytes), which means there’s more data to be handled.
        public static void HandleData(int _playerID, byte[] _data)
        {
            ...

            while (_packetLength > 0 && _packetLength <= Globals.clients[_playerID].buffer.Length() - 4)
            {

            }
        }
Inside the while loop, we’ll read out an integer (the packet length) because we don’t need that anymore. Then we’ll set _data to the sequence of bytes in the client’s buffer indicated by _packetLength, so that _data contains the bytes that make up exactly one packet. Next, we need to call HandlePackets, a method we haven’t yet created, and pass it the player ID and the packet data.
            while (_packetLength > 0 && _packetLength <= Globals.clients[_playerID].buffer.Length() - 4)
            {
                Globals.clients[_playerID].buffer.ReadInt();
                _data = Globals.clients[_playerID].buffer.ReadBytes(_packetLength);
                HandlePackets(_playerID, _data);
            }
Since the byte array that our HandleData method receives could potentially contain more than one packet, we need to be prepared for that, or we risk losing packets. To do this, we set the packet length back to zero, and perform the same check we did earlier to determine if there’s another packet in the leftover data.
            while (_packetLength > 0 && _packetLength <= Globals.clients[_playerID].buffer.Length() - 4)
            {
                ...

                _packetLength = 0;

                if (Globals.clients[_playerID].buffer.Length() >= 4)
                {
                    _packetLength = Globals.clients[_playerID].buffer.ReadInt(false);
                    if (_packetLength <= 0)
                    {
                        Globals.clients[_playerID].buffer.Clear();
                        return;
                    }
                }
            }
To finish this method off, we’ll check if the packet length is one or less, in which case we need to clear the client’s buffer.
        public static void HandleData(int _playerID, byte[] _data)
        {
            ...

            while (_packetLength > 0 && _packetLength <= Globals.clients[_playerID].buffer.Length() - 4)
            {
                ...
            }

            if (_packetLength <= 1)
            {
                Globals.clients[_playerID].buffer.Clear();
            }
        }
Now we need a way to call the appropriate method to handle each packet based on its packet ID. We can use a delegate along with a dictionary to accomplish this. At the top of the ServerHandle class, add a delegate called Packet and a Dictionary<int, Packet> called “packets”.
        public delegate void Packet(int _playerID, byte[] _data);
        public static Dictionary<int, Packet> packets;

        public static void HandleData(int _playerID, byte[] _data)
        {
            ...
        }
We’re now ready to handle packets. Create a HandlePackets method and make a new ByteBuffer instance. Then write the _data to the buffer, read out the packet ID and dispose the buffer.
        public static void HandleData(int _playerID, byte[] _data)
        {
            ...
        }

        private static void HandlePackets(int _playerID, byte[] _data)
        {
            ByteBuffer _buffer = new ByteBuffer();
            _buffer.WriteBytes(_data);

            int _packetID = _buffer.ReadInt();
            _buffer.Dispose();
        }
Using the packet ID, we can now call the appropriate method to handle the packet’s contents.
        private static void HandlePackets(int _playerID, byte[] _data)
        {
            ...

            if (packets.TryGetValue(_packetID, out Packet _packet))
            {
                _packet.Invoke(_playerID, _data);
            }
        }
Before this will work however, we need to populate the packets dictionary. Create an InitPackets method to do this, and then call it in our ServerTCP’s InitNetwork method.
        public delegate void Packet(int _playerID, byte[] _data);
        public static Dictionary<int, Packet> packets;

        public static void InitPackets()
        {
            Logger.Log(LogType.info1, "Initializing packets..");
            packets = new Dictionary<int, Packet>()
            {
                { (int)ClientPackets.welcomeReceived, WelcomeReceived }
            };
        }
        public static void InitNetwork()
        {
            Logger.Log(LogType.info1, "Starting server on port " + port + "..");
            ServerHandle.InitPackets();
            socket = new TcpListener(IPAddress.Any, port);
            socket.Start();
            socket.BeginAcceptTcpClient(new AsyncCallback(ClientConnected), null);
        }
Finally, back in our ServerHandle class, create a WelcomeReceived method to handle that packet. Methods that handle packets are quite similar to the ones that create them. First we create a new ByteBuffer instance. Then we write the received data to the buffer, read the packet ID, and dispose the buffer. When that’s done, we can use the received data to take appropriate actions. Today we’ll just send the client’s username back to the server, so a simple console log will suffice when we receive that..
        private static void WelcomeReceived(int _playerID, byte[] _data)
        {
            ByteBuffer _buffer = new ByteBuffer();
            _buffer.WriteBytes(_data);
            _buffer.ReadInt();

            string _username = _buffer.ReadString();
            _buffer.Dispose();

            Logger.Log(LogType.info2, "Connection from " + Globals.clients[_playerID].socket.Client.RemoteEndPoint + " was successful. Username: " + _username);
        }
And that’s it for the server. The client will take a lot less work, and since most of the logic is really similar, I’ll keep explanations shorter to prevent this post from getting even longer.
2 – Setting up the client
We’ll be writing our client in Unity, so open that up and start a new project. We’ll create all our scripts right off the bat. You’ll need ClientTCP, ClientHandle, ClientSend, and Packets scripts. Additionally, copy the ByteBuffer file from the server into your Unity project.
Let’s take care of the Packets class first, since that’s quick. Copy your Packets enums over to the client’s file. It’s important to always keep your server’s and client’s packet ID enums identical—order matters!
public enum ServerPackets
{
    // Sent from server to client
    welcome = 1
}

public enum ClientPackets
{
    // Sent from client to server
    welcomeReceived = 1,
}
On the client side, I’ll be using a singleton implementation (it works better with Unity) instead of making everything static. Add this code to the ServerTCP class. It’ll ensure that there is only ever one instance of the class in existence, while allowing us to access it from other classes. Don’t forget to add the System.Net.Sockets namespace.
public class ClientTCP : MonoBehaviour
{
    public static ClientTCP instance;

    private void Awake()
    {
        if (instance == null)
        {
            instance = this;
        }
        else if (instance != this)
        {
            Debug.Log("Instance already exists, destroying object!");
            Destroy(this);
        }
    }
}
We’ll need a variable to store the port number, the server’s IP, and the local player’s ID, so let’s add those. Make sure the port number matches the one you chose earlier for the server. The IP should be set to 127.0.0.1, also known as localhost.
    public static ClientTCP instance;

    public string ip = "127.0.0.1";
    public int port = 16320;
    public int myPlayerID = 0;

    ...
The rest of the fields might look familiar. Just like in the server’s Client class, we need a TcpClient, a NetworkStream, and a ByteBuffer field.
    public int myPlayerID = 0;

    public TcpClient socket;
    public NetworkStream stream;
    private byte[] receiveBuffer;

    ...
Next, we’ll add a method to start everything up on the client, and we’ll call it in Start(). Inside, we need to initialize our socket field, as well as our receiveBuffer. Then we can attempt to connect to the server.
public class ClientTCP : MonoBehaviour
{
    ...

    private void Awake()
    {
        ...
    }

    private void Start()
    {
        ConnectToServer();
    }

    public void ConnectToServer()
    {
        socket = new TcpClient
        {
            ReceiveBufferSize = 4096,
            SendBufferSize = 4096,
            NoDelay = false
        };

        receiveBuffer = new byte[socket.ReceiveBufferSize];
        socket.BeginConnect(ip, port, ConnectCallback, socket);
    }
}
Now we need to add a ConnectCallback method, which we use to end the connection attempt. We can then proceed to check if we connected successfully, in which case we set the TcpClient‘s NoDelay property to true, assign its NetworkStream to our stream field, and start reading data from the stream.
    public void ConnectToServer()
    {
        ...
    }

    private void ConnectCallback(IAsyncResult _result)
    {
        socket.EndConnect(_result);

        if (!socket.Connected)
        {
            return;
        }
        else
        {
            socket.NoDelay = true;
            stream = socket.GetStream();
            stream.BeginRead(receiveBuffer, 0, socket.ReceiveBufferSize, ReceivedData, null);
        }
    }
Instead of rewriting ReceivedData from scratch, copy it over from the server’s Client class. Switch outServerHandle.HandleData(playerID, _tempBuffer); for ClientHandle.instance.HandleData(_tempBuffer); and change the Logger.Log statement to a Debug.Log.
    private void ConnectCallback(IAsyncResult _result)
    {
        ...
    }

    private void ReceivedData(IAsyncResult _result)
    {
        try
        {
            int _byteLength = stream.EndRead(_result);
            if (_byteLength <= 0)
            {
                CloseConnection();
                return;
            }

            byte[] _tempBuffer = new byte[_byteLength];
            Array.Copy(receiveBuffer, _tempBuffer, _byteLength);

            ClientHandle.instance.HandleData(_tempBuffer);
            stream.BeginRead(receiveBuffer, 0, socket.ReceiveBufferSize, ReceivedData, null);
        }
        catch (Exception _ex)
        {
            Debug.Log("Error receiving data: " + _ex);
            CloseConnection();
            return;
        }
    }
Finally, add a CloseConnection method which closes the socket.
    private void ReceivedData(IAsyncResult _result)
    {
        ...
    }

    private void CloseConnection()
    {
        socket.Close();
    }
2.1 – Sending data
In the ClientSend class, add the same singleton implementation as we did in the ServerTCP.
public class ClientSend : MonoBehaviour
{
    public static ClientSend instance;

    private void Awake()
    {
        if (instance == null)
        {
            instance = this;
        }
        else if (instance != this)
        {
            Debug.Log("Instance already exists, destroying object!");
            Destroy(this);
        }
    }
}
For the send data method, simply copy over the server’s SendDataTo method, rename it to SendDataToServer, and remove the player ID parameter. Additionally, change Globals.clients[_playerID] to ClientTCP.instance in both occurrences, and swap Logger.Log out for Debug.Log.
    private void Awake()
    {
        ...
    }

    public void SendDataToServer(byte[] _data)
    {
        try
        {
            if (ClientTCP.instance.socket != null)
            {
                ByteBuffer _buffer = new ByteBuffer();
                _buffer.WriteInt(_data.GetUpperBound(0) - _data.GetLowerBound(0) + 1);
                _buffer.WriteBytes(_data);

                ClientTCP.instance.stream.BeginWrite(_buffer.ToArray(), 0, _buffer.ToArray().Length, null, null);
                _buffer.Dispose();
            }
        }
        catch (Exception _ex)
        {
            Debug.Log("Error sending data: " + _ex);
        }
    }
To finish it off, add a WelcomeReceived method to construct a packet that will be sent to the server. Use the same format as you did on the server, but make sure to change the packet ID. Instead of sending a welcome message and the player’s ID like we did on the server, let’s send a dummy username.
    public void SendDataToServer(byte[] _data)
    {
        ...
    }

    public void WelcomeReceived()
    {
        ByteBuffer _buffer = new ByteBuffer();
        _buffer.WriteInt((int)ClientPackets.welcomeReceived);

        _buffer.WriteString("Test player name");

        SendDataToServer(_buffer.ToArray());
        _buffer.Dispose();
    }
2.2 – Receiving data
We’re almost done now, I promise! We’ve reached the home stretch of this whopper of a blog post.
Once again, add the singleton implementation to your ClientHandle class.
public class ClientHandle : MonoBehaviour
{
    public static ClientHandle instance;

    private void Awake()
    {
        if (instance == null)
        {
            instance = this;
        }
        else if (instance != this)
        {
            Debug.Log("Instance already exists, destroying object!");
            Destroy(this);
        }
    }
}
Much like on the server, we’ll need a delegate and a dictionary to process packets, so let’s create those, along with the InitPackets method.
public class ClientHandle : MonoBehaviour
{
    public static ClientHandle instance;

    public delegate void Packet(byte[] _data);
    public Dictionary<int, Packet> packets;

    private void Awake()
    {
        ...
    }

    public void InitPackets()
    {
        Debug.Log("Initializing packets...");
        packets = new Dictionary<int, Packet>
        {
            { (int)ServerPackets.welcome, Welcome }
        };
    }
}
Don’t forget to call InitPackets in the ClientTCP’s ConnectToServer method.
    public void ConnectToServer()
    {
        ClientHandle.instance.InitPackets();

        socket = new TcpClient
        ...
    }
We also need a ByteBuffer field, so add that in.
    public static ClientHandle instance;

    private ByteBuffer buffer;
    public delegate void Packet(byte[] _data);
    ...
As for the HandleData method, we can copy that over from the server too. Just remove the player ID parameter, and don’t pass it on to the HandlePackets method. You’ll also need to replace all the occurrences of Globals.clients[_playerID].buffer with buffer. I recommend using Visual Studio’s find and replace feature (Ctrl + F) to make this easier.
    public void HandleData(byte[] _data)
    {
        byte[] _tempBuffer = (byte[])_data.Clone();
        int _packetLength = 0;

        if (buffer == null)
        {
            buffer = new ByteBuffer();
        }

        buffer.WriteBytes(_tempBuffer);

        if (buffer.Count() == 0)
        {
            buffer.Clear();
            return;
        }

        if (buffer.Length() >= 4)
        {
            _packetLength = buffer.ReadInt(false);
            if (_packetLength <= 0)
            {
                buffer.Clear();
                return;
            }
        }

        while (_packetLength > 0 && _packetLength <= buffer.Length() - 4)
        {
            if (_packetLength <= buffer.Length() - 4)
            {
                buffer.ReadInt();
                _data = buffer.ReadBytes(_packetLength);
                HandlePackets(_data);
            }

            _packetLength = 0;

            if (buffer.Length() >= 4)
            {
                _packetLength = buffer.ReadInt(false);
                if (_packetLength <= 0)
                {
                    buffer.Clear();
                    return;
                }
            }
        }

        if (_packetLength <= 1)
        {
            buffer.Clear();
        }
    }
The HandlePackets method can be copied over too. Once again, remember to remove the player ID parameter.
    private void HandlePackets(byte[] _data)
    {
        ByteBuffer _buffer = new ByteBuffer();
        _buffer.WriteBytes(_data);

        int _packetID = _buffer.ReadInt();
        _buffer.Dispose();

        if (packets.TryGetValue(_packetID, out Packet _packet))
        {
            _packet.Invoke(_data);
        }
    }
And finally, we need to add a method to handle our Welcome packet. It’s the same format as server-side, so I won’t explain it in much detail. Just keep in mind that data needs to be read out in the same order as it’s written to the buffer. Put a Debug.Log at the end so we know we’ve received the packet. Additionally, assign the integer we received to the ClientTCP’s myPlayerID field and send the WelcomeReceived packet to the server.
    private void HandlePackets(byte[] _data)
    {
        ...
    }

    private static void Welcome(byte[] _data)
    {
        ByteBuffer _buffer = new ByteBuffer();
        _buffer.WriteBytes(_data);
        _buffer.ReadInt();

        string _msg = _buffer.ReadString();
        int _myPlayerID = _buffer.ReadInt();
        _buffer.Dispose();

        Debug.Log("Message from server: " + _msg);
        ClientTCP.instance.myPlayerID = _myPlayerID;
        ClientSend.instance.WelcomeReceived();
    }
2.3 – Final touches
That’s it for the programming side of things! The final step is to create a new empty GameObject called NetworkManager and attach the ClientTCP, ClientSend, and ClientHandle scripts to it. Double check that your port and IP are set correctly, and then run the server. Once it starts up, enter play mode in Unity and you should see the welcome message written to the console. Back in the server console, you should see a “connection succeeded” message.


Conclusion
Well, that’s the end of it. If you made it this far, your persistence is impressive! I really hope you learned something and found this post useful—it took me a long time to put together. Again, this is my first tutorial, so let me know about any improvements I can make.
And remember, if you run into any issues and you haven’t already, come join my Discord server—we’d love to have you!
I’ll be adding a few more parts to this tutorial series in the near future, so stay tuned for when those come out.